Wednesday, December 30, 2015

(Creamy) Red Onion Soup

The creamy part is optional, if you're looking for a vegan onion soup recipe.

This red onion soup recipe was in the newspaper one day, and it's the first recipe I've used that I read and used in German. My German is improving! My German is improving! I'm sorry there are no photos yet. Next time I cook it I will remember to document the process. But you can do this without photos, believe me. It is that simple and easy.

Most importantly, this is a delicious onion soup recipe. It's a simple soup recipe, but it does require a couple of odd ingredients. I've made it three or four times in the last two months and I can see that this will be a staple for winters to come. And it's just as yummy the next day for lunch. I've even cooked it early in the day and reheated it for guests later in the evening - still perfectly delicious. The soup will separate a little, but once warm it will blend together easily.

Who ever heard of a red onion soup? Everyone knows about French onion soup, or as they say in France 'soupe a l'oignon'. This is very different. It's a blended soup, which means it's hard to mess it up as long as you've got an 'immersion blender', which is what I hear it's called in English. In German we just call it by its literal name: Stabmixer. (Don't forget to pronounce the 'st' like 'sht').

The soup has three garnishes - croutons, which you can buy readymade or make yourself with the recipe below, creme fraîche, and some of the gently fried onions. Mmmmm.

Anyway, let's get to my translation of the actual red onion soup recipe and hope for the best, shall we?

Rote-Zwiebel-Rahmsuppe (Red Onion Cream Soup)
Cook and prep time: About 40 minutes

Ingredients (for 4-6 servings):

500 grams (1.1 lbs) red onions (Höri-Bülle, if you can find them, otherwise whatever)
3 Tablespoons olive oil
150ml (2/3rds of a cup) apple juice
2 Tablespoons tomato paste
1.5 Liters (6.35 cups) broth of your choice
150g (5.3 oz) creme fraîche
1 shot of dry vermouth
salt and pepper

Garnish: Croutons (recipe also included below)


Cut the onions into slices. In a medium soup pot, use 3 tablespoons of oil to cook the onions over medium heat, stirring often. If they are cooking too fast, lower the heat until they are cooking gently and slowly. After about 5 minutes, or when they are soft and slightly transparent, add a pinch of salt and then set aside about 2-3 tablespoons of the onions to use later as garnish.

Next you will deglaze the pot with the shot of dry vermouth. Pour in the vermouth and stir the onions, letting the vermouth cook off and into the onions. When the pan is almost dry again, add half of the apple juice. Cook until it is absorbed. Then add the other half of the apple juice, letting it cook into the onions, too. Don't boil the onions in apple juice! Do it in two steps!

Once the liquid is again absorbed, add the tomato paste and stir well, allowing it to heat and cook for a minute or two. Add the broth and some salt and pepper (careful with salt, your broth may already be plenty salty), and then let the soup simmer for about 10 minutes on medium-low heat.

Meanwhile, set aside a small portion of the creme fraîche to us as a garnish.

After 10 minutes, remove the soup from heat and add the remaining creme fraîche, stirring until it is mostly combined. Now use your immersion blender to blend the soup until smooth. It will still be a pretty thin liquid, not thick and creamy. Add salt and pepper to taste.

Serve with a few croutons, a dollop of creme fraîche, and some slivers of onion, and even some cayenne if you're into that.


Croutons

Ingredients:
4 cups bread cubes, best is baguette or a dried out stump of bakery bread
1/3 cup olive oil
1/4 teaspoon salt
1/4 teaspoon pepper

Pre-heat the oven to 176C / 350F. Mix the salt and pepper into the olive oil in a large mixing bowl. Toss the bread cubes into the oil until coated fairly evenly. Spread bread out on a baking sheet in a single layer and toast in the oven for 6-7 minutes, toss them well, and then put them back in for another 6-7 minutes. They should look toasted when you remove them.

Let the croutons cool for a few minutes on the baking sheet to dry out just that little bit more. Yumm.

Wednesday, January 28, 2015

How to Make Fruit Kefir

Last summer my friend and I started making kefir every day and got really into fruit kefir. It's basically homemade soda (I'm convinced this is where the idea of soda came from) but gently fermented like kombucha. It's very easy to maintain as long as you're into it and can do it almost every day. I'm no doctor, but the amount of probiotics in this stuff has to be good for you. The kefir is alive and it digests the sugar (fermentation) but there's only a trace amount of alcohol. Which is good for you, of course. I'm quite certain it's much better for you than regular soda. Plus it's delicious. 

Here's the set of instructions which I made for a friend to whom I sent some dried out kefir so she and her daughter could start drinking fruit kefir, too. I have had two kinds of fruit kefir. The first was a very fine sediment which had to be cared for carefully - very easy to accidentally dump it. The second is full kefir grains, which are like big lumpy tapiocas which can be strained out and are easier to care for.


Main 2 liter jar of water kefir on left, two-1 liter bottles, plastic funnel and measuring cup (and a mess).

A few important things:

1. Avoid metals! You know this if you make milk kefir, but the deal is that only absolutely for certain 100% stainless steel is okay. I finally found some really high quality stainless steel things, but I used plastic for a long time just to be sure. A lot of stainless things are just coated with stainless steel and a small imperfection could do the kefir harm.

2. You can totally leave the kefir for a couple of days without "feeding" it fresh sugar water. If you leave it for 4 days or more it won't be drinkable and the kefir will be starving. It'll be super sour as the kefir will have digested every last bit of sugar. If you're going away for a long time, I recommend drying it out with a clean piece of cloth. With fine sediment kefir, pour the kefir through the cloth slowly and try to capture as much goop as you can. Dry it in the open completely before wrapping it in cloth or paper towels for storage. It can then be re-animated when you're back and ready.

3. This is a two stage fermentation process. The first fermentation is 24-48 hours on the counter unsealed with the kefir, sugar water, lemon, and fig. The second stage is 12-24 hours in a sealed bottle on the counter with fruit or tea which is primarily to flavor the kefir. Then it goes in the fridge to stop fermentation and cool for delicious enjoyment.

4. The lemon and fig are mostly for proper acidity and can be left out if you run out. Or you can use half as much for a short time. The kefir won't die if you don't have these things. Fresh figs are called for but I can't get those and dried figs are easy. They work just fine.

5. Depending on how long you leave the fruit kefir in the bottle for the second fermentation - and how well sealed the bottles are - you'll get more or less carbonation. Experiment. But I warn you, if you leave it out on the counter for more than 18 hours, you may want to open it outside, just in case. Better than spraying it all over your kitchen and yourself. (Yes, I have done this).

6. The level of sweetness is also dictated by the amount of time it spends in the bottle. After about a day in the fridge it's pretty sour. So drink everything within about a day or simply pour the leftovers out. I know, I find it hard to waste it, too.

7. The flavoring process is really fun and you should experiment. I use half of a clementine per 1/4 gallon (1 liter) bottle. One of my favorites is lavender and lemon. We also got great flavors from dried cranberries. About 15-20 crans with a sprig of mint or half an apple = mmmm. We also use teas, from black teas including earl grey (my favorite) to green tea or mint tea or sage tea... again, see what you like. I recommend a tablespoon of tea, at least, but you'll have to see what you prefer. I use two tablespoons for lighter teas.

8. The type of 2nd fermentation bottles you get is important, both because they should seal tightly and because putting thin slices of apple or citrus in (and getting them out) can be tough. You'll see the bottles I use in the pictures. They're great as far as sealing (and because there's very little metal and it doesn't touch the kefir) but it takes time getting used to the process of putting the fruit in and getting it out. Filling the bottle (once it's empty) with water and pouring the fruit into the sink has been the best strategy.

9. Just ask if you have questions or problems!

10. You really can't go wrong as long as you don't pour out the goop at the bottom. Just leave it in there and keep refilling. It's nice to have a second 1/2 gallon (2 liter) jar so you can sometimes transfer the fruit kefir and completely clean out the jar, but I only have one and it's fine.

Okay! Now the process!

In the package I sent, the kefir was like a dried out gob of lemon seeds, small dark brown fig seeds, and a creamy colored powder/goop, wrapped in some cloth. It can stay in this dried out state for a long time.

Put as much of the kefir and seeds as you can into a half gallon (2 liter) glass jar and wash through the cloth with a bit of water if it helps you extract a bit more. The seeds accumulate. They do no harm. With sediment-like fruit kefit, they're impossible to remove without losing some kefir, too.

Equipment:
One 1 gallon/2 liter jar with a non-metal lid
Two 1/2 gallon/1 liter bottles
100% stainless steel or plastic funnel
100% stainless steel or plastic fine mesh strainer
A large measuring cup

Ingredients: lemons, dried (or fresh) figs, sugar, and water. Each batch requires:

1/2 lemon, cut in half again
1 dried/fresh fig, quartered
1/3 cup sugar, mixed well into about 1/2 gallon (2 liters) of water
Steps:
1. Mix 1/3 cup of sugar (I use unrefined, organic cane sugar) with 1/2 gallon of water.
2. Cut a half a lemon into two slices
3. Cut a dried (or fresh!) fig into four quarters

Put the fig pieces, lemon slices, and sugar water into your jar with the kefir and leave it on the counter for 24 hours. 

The lid should not be closed tightly! For this stage, gas needs to escape. So turn the lid all the way tight and then back it off a bit so air can escape. 

24 hours is the length of time that seems to work for me, but the other measure is "when the figs float". So you could do this as often as you get floating figs. The temperature of your kitchen will also have an effect. Warmer and it'll ferment faster, colder and it'll slow down.

The next day, about 24 hrs later, without mixing up the liquid, slowly and gently pour off as much water kefir as you can and toss it out. This first batch should be tossed because the kefir is now just waking up. If you have kefir grains, strain out the kefir and dump all the liquid. I usually grab the floating figs and lemons with my freshly washed fingers. You may want to do another batch or two before drinking it to let the kefir revive properly.

looking ready
don't pour out that stuff on the bottom
that's about what's left after I pour off the drinking kefir

Now, refill the jar again with the same mixture of water and sugar, lemon and fig.


For the first drinkable batch:

When the kefir has been on the counter for 24-48 hours and you're ready for the 2nd fermentation, start by prepping your fruit or tea and putting it into your 2nd ferment bottles.


cranberry mint today

Pick out the lemon and figs from the main jar. If you want to, squeeze the lemons back into the water kefir - this is mostly for flavor. I do it every time. The figs and lemons are now done and can get composted or whatever you do.

If you have kefir grains you will simply strain the kefir out, reserving the liquid to pour into your sealable bottles. With sediment kefir, gently and slowly pour the fruit kefir from the main jar into a measuring cup (or something similar) that makes it easy to pour into the funnel and the bottles.

Because of the sediment, I usually pour one liter (or 1/4 gallon) into the measuring cup, split it evenly between the two bottles, and then pour the rest and split that evenly. The last bit that you gently and slowly pour out of the main jar will have some kefir floating in it. This continues to digest sugar and plays a major role in the carbonation process. I try not to pour off more than I need to get the majority of the liquid out, but sometimes I pour a bit extra so I know I get bubbles. If you have sediment style kefir, you'll see white-ish, flake-like floaties and you'll know what I'm talking about.

The bottles with fruit or tea and kefir in them should be well sealed and should rest on the counter for 12 hours (or so). 18hrs seems okay, too, and makes for fizzy drink. Any more and it tends to get a bit like a shaken bottle of champagne. Fun! But messy. Results will dramatically differ depending on the temperature of your kitchen, the season, etc, so you'll just have to experiment.

After 12 hours, the kefir bottles can go in the fridge. As soon as it's cold, it's ready to drink! I use a small (yeah) plastic or 100% stainless steel fine mesh strainer to keep the fruit and tea out of my glass.

always this on my counter and two more bottles in the fridge

Tuesday, September 17, 2013

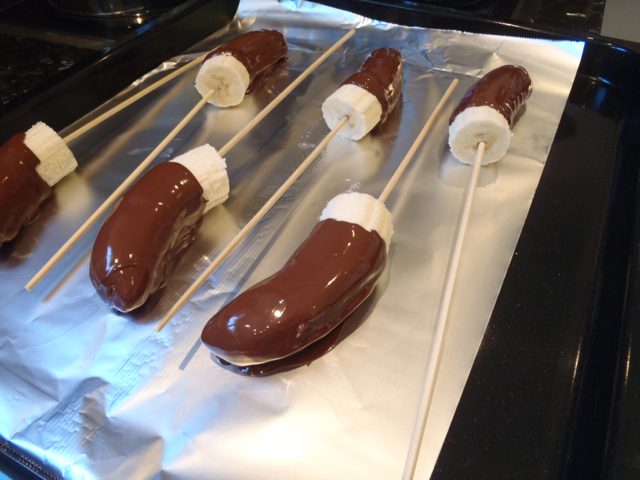
Dessert! Frozen Bananas, Dipped in Chocolate

This is so easy but so impressive. Again, I'm using Thug Kitchen because dude has easy recipes that work (and it makes me laugh).

It'll take you about 10 minutes to make these babies, but you have to be prepared. You've got to have popsicle sticks. OR, if you're like me, you'll use whatever you could find. I found fondue forks and they worked beautifully. The second time (see photos) I used wooden barbecue sticks and I do NOT recommend them. You want something that is not a tube so they can't roll around.

You'll also need to melt chocolate using a double boiler or the microwave. I made a double boiler with a small pot on the bottom and a metal bowl on top that was big enough to not sit on the bottom of the pot. You follow? You want a space between the bottom of your top bowl/pot and the water in the lower pot. Chocolate goes on top and water goes in the bottom.


Why all this trouble to melt chocolate? Chocolate will never harden again if it's heated too much! The good news is you'll be freezing this stuff so it's not too critical that you get the melting just right.

I promise this is actually really easy, even the first time.

Prep time: 15 minutes
Cook time: 3-5 minutes

Gear:
8 popsicle sticks, or something similar
a cookie sheet covered in baking paper, wax paper, or aluminum foil
a freezer

Ingredients:

4 bananas (makes 8 pops, adjust as appropriate)
200g semi-sweet chocolate (bar, chips, chunks) cut or broken into small pieces
2 tbs roasted, chopped nuts (optional)


Peel your bananas and cut them in half widthwise (so they're half as long as a whole banana). The popsicle sticks - or tiny forks - get gently pushed into the flat end. Don't push them in too far or you risk splitting the banana. Set them up so they're lying where they'll be when they go in the freezer, so you know you've got space for all of them.


Setting up the double boiler for chocolate melting... a pot goes on the stove over low heat with about an inch of water in it. Then you place an all metal bowl or another pot on top with the chocolate in it. The top bowl can touch the water, but not the bottom of the bottom pot.


Or, use a microwave and heat the chocolate in 25 second increments, stirring between each 25 seconds, until it's melted.

The hardest part is getting the chocolate to evenly cover the bananas. I dipped them as best I could, but ended up using a butter knife to spread chocolate where it was missing. I even scooped chocolate over the bananas when necessary. Drip as much excess chocolate off as possible.


Lie each popsicle on the cookie sheet and don't move it again. A pool of chocolate may form underneath, but it'll be just fine. Sprinkle your roasted, chopped nuts over the visible side. The second time I did this I used shredded coconut. Mmmm tropical.


Sunday, September 1, 2013

Easy Eggplant / Aubergine Dip Recipe

What to do with eggplant? Or aubergine, if you will.

I have never, ever bought or successfully cooked an eggplant before today. I don't like them. There was one time when a friend gave us some eggplants fresh from the garden, and I turned them into a badly textured curry mush catastrophe.

So I was facing off against an eggplant in the fridge (more like ignoring it) and was lucky to stumble on this recipe from Thug Kitchen. Warning, that is a website absolutely full of expletives! It's also vegan, and this is a vegan eggplant dip recipe, incidentally.

It turned out delicious and it was super easy. I urge you to start with half the lemon juice and work up to the full amount if you are at all unsure whether your eggplant is indeed 'medium' sized. Otherwise, you can't really go wrong, even if you don't like eggplant at all. This is the easiest thing to do with eggplant, guaranteed.

Prep time: 10 minutes
Cook time: 25-30 minutes

Ingredients:

1 medium sized eggplant (2.5 lbs or so)
2 tbs lemon juice (the juice of half a lemon)
2 tbs chopped parsley
1/4 tb salt
1-2 tbs chili powder
2 cloves of garlic, finely chopped
2 tbs olive oil and/or tahini (I didn't have tahini on hand, but I love it and will try it next time)


Start by roasting the eggplant. If you like to grill, you can grill eggplants whole. I heated the oven to 190 C (375F). I smeared a bit of butter on the bottom side of the eggplant and set it on a small baking sheet, then I carefully poked a few holes in it with a fork. It took about 30 minutes for the eggplant to get totally soft, which I tested by nudging it with a wooden spoon.

While the aubergine roasts, you can prep the rest of the ingredients. Chop things finely and mix all the other ingredients in a small mixing bowl. Easy eggplant dip = not complicated. Leave out a sprinkle of parsley and chili powder for garnish later.

When the aubergine is squishy soft (it can't be too soft for this so go long on the roast rather than cut it short) let it cool then cut it in half, lengthwise. I didn't let mine cool because I was impatient, but I managed to cut it in half without burning myself. I used a knife and a spoon to scoop, shovel the eggplant meat out of it's skin and onto a cutting board. I then chopped it up a bit to make it easier to stir into the rest of the dip ingredients.  Mix it all up and you're done!

Alternatively! You can throw everything into a blender or food processor, or use a stab mixer, and create a super creamy eggplant dip that way. I used a fork to mash everything together and I think I prefer the results, but you're the one who'll be eating this so do what you prefer. If you use a machine, leave out the parsley until the very end.

Enjoy on crackers or bread or with pita or tortillas.

Wasn't that easy? And guess what? It makes eggplant edible.

Wednesday, February 29, 2012

The Easiest Cookie Recipe in the World

And I mean it. For days when you have nothing to bake with but want a delicious, satisfying cookie, this is the one.


The recipe is so simple it's stupid. Easy cookies. But you can't be allergic to peanuts, that's the only thing that'll make this a no-fun recipe, because it is in fact the easiest peanut butter cookie recipe in the world.


Ingredients:

1 cup peanut butter
1 cup sugar (okay, I used 3/4 of a cup because I just couldn't do it)
1 egg

optional: chocolate chips

Instructions:

Heat oven to 375 F or 175 C.

Mix the three ingredients together until smooth. Add chocolate chips or other chunks if desired.

Dollop teaspoon sized dollops onto baking paper on a baking sheet. These will stick, so paper is highly recommended.

Bake for 8 minutes. Remove carefully and let cool on a cooling rack.

I bet you can't find an easier cookie recipe than that.

Sunday, February 12, 2012

Quick Couscous Vegetables - New Exotic (and easy) Recipe

My first visit to a Couscouserie happened in the summer of 2010. We were riding from France into Germany along the Saar River and we were desperate to get back to German bike paths and routes. Around lunchtime, when we were very hungry and too lazy to make ourselves lunch, we rolled into a small city. Usually we'd just have a picnic, but when we rolled into town we decided to stop.

The vegetarian option was couscous with a tomato vegetable broth-like soup that we were supposed to ladel over the couscous. Maybe it was the fact that we'd been riding fully loaded touring bikes all morning, but this simple meal was incredibly delicious. Here's my attempt at recreating something... similar. The end result is like a vegetable ragu or red sauce, but slightly more fluid, and you simply pour it over a bowlful of couscous. This is a simple, fast, and exotic dish. Garnish with chopped parsley, or for the full Moroccan experience, chopped mint.


Coucous Vegetables (for 2)

Ingredients:

1 tablespoon butter or oil of your choice
1 med onion, diced
1 stick celery, including leaves, if you can get them, chopped
1 tsp harissa (optional, this is for spicy lovers - you can add chili flakes if you prefer)
1 clove garlic, chopped
1 carrot, thin half moons
1/2 of a zucchini, diced
1 can tomato soup or sauce - or just diced tomatoes (any will do)
1/2 cup water (or thereabouts)

Couscous

Making the couscous is the easy part - you can boil the water in advance and re-heat it just before you make the couscous, but you should probably do the couscous last. On the box will be instructions, something like this: boil water, pour 1 part couscous and 2 parts water into a bowl, cover and let sit for 4 or 5 minutes, or until water has been absorbed. Fluff with a fork and serve.

I recently browned garlic in a lot of butter and added that when I added the hot water. Delicious if you want to try it. Another way to improve on simple couscous is to add a tablespoon of butter once the water is absorbed and mix well.

For the tomato vegetable part:

Prep the veggies.


Over medium heat, saute the onions until slightly soft.

Add the harissa or chili flakes and celery, and stir for about a minute.

Then add the garlic and carrots. Cook, and stir frequently, for about 8 minutes (depending on your preference for crunchy or soft carrots).

Add the zucchini and cook for 3 more minutes.

Once the veggies are at the desired texture, add the tomato sauce, soup, or tomatoes and about half a cup of water. Let cook for about 5-10 minutes - again, depending on whether you prefer slightly crunchy or totally cooked veggies.

You don't want this to be a totally watery meal, but remember that when the couscous soaks up the sauce you get great flavor. Enjoy!


Thursday, June 2, 2011

French Onion Soup

I have always loved French Onion Soup, so good with it's crusty cheese bread on the top. Most recipes call for beef stock, but vegetable stock is just as good, if you've got nice vegetable stock. I ran into some organic, vegetarian, french onion soup stock, so I decided to brave making the soup myself. Lucky us!

After reading a few recipes online, I used (mostly) this one. I prefer the longer slices of onion to small chopped onion in this soup, although I'm usually partial to finely chopped onions. And I like my bread in the soup. But you can chop how you like, and serve the bread on the side if you prefer. On the second go-round I added more wine, and I think that made the flavor even better.

Prep should take about 15 minutes, depending on how you chop the onions, and cooking time is about 30 minutes.

Ingredients (serves 2):

2 medium onions, sliced
500ml broth (beef, veg, french onion if you can find it)
1 tbl spoon olive oil
1 tbl spoon butter
1 cup white wine
2 teaspoons fresh thyme, chopped (or 3 teaspoons dried)
1 clove garlic, chopped
shredded cheese to taste - gruyere is best, mozzarella is great, I used an aged, crumbly chedder, which was also delicious.


Prep your broth, so you can put the onions in as soon as they reach perfectly cooked. Slice your onions and then saute them in the butter and olive oil. The lower the heat, the less likely you'll brown the onions, but of course it will take them longer to cook. I like a medium heat, and I stay close to stir often, keeping them cooking without letting them burn. This can take from 10 minutes to 30 minutes, depending on temp. If you can stand there stirring constantly, it'll be fast. So prep that broth! The onions should be cooked, transparent, but not totally gone, because they will cook a little in the broth, as well. I accidentally over cooked the batch in this photo, but the soup was still yummy. So...


Once the onions are done, throw in half the garlic and stir for 30 seconds. This puts a little fry into your garlic flavor, which adds depth. Then add onions and garlic to the broth, also adding the wine and thyme, and the rest of the garlic. Stir and leave on the stove at a medium heat to cook for 15-20 minutes. Don't let the onions dissolve, best way to see if it's done is to taste an onion. If it's delicious, take it off the stove.


While the soup cooks, toast two pieces of bread. Baguette is good, but we had some nutty brown bread so I used that. After it's toasted, sprinkle cheese on top and put it in the oven on broil until the cheese is mostly melted.

To serve I put the soup in bowls, then put a piece of bread on top, adding a bit more cheese and letting that create a bit of a layer on top of the soup in the oven. If you have better bowls than I do, you can probably do this more successfully.


I guarantee that the first time you make this, it'll be delicious. Then, the second time, it'll only get better. It's quite fast, but seems like a fancy dish - great for entertaining, I would say. Now that I know, I'll be making this more often.

Yummmy!

Thursday, May 26, 2011

Simple Side Salad - Raspberries

If you don't want to make anything fancy, but like the feel of a fancy salad, you can always get some lettuce mix and throw raspberries on top. This isn't even a recipe, but if you put together the salad dressing posted earlier, it'll feel like something special. And it looks beautiful!

Thursday, May 5, 2011

Chipotle and Cheddar Mashed Potatoes


Finally some photos! Exotic and so delicious. I made my own adobo sauce (see below) and the cheese here is amazing. So enjoy this as a side, or alongside some sautéed green beans, like we did. I made a lot of extra, assuming this would be a nice leftover for tomorrow. Potato size is not so important. The important part is that they are cubed into pieces that are all about the same size.

3 large and 2 medium potatoes, cut into cubes
3 cloves garlic, broken by placing them under the flat side of a knife and pushing down until they pop
1 cup grated or crumbled cheddar cheese, the sharper, the better
2 tablespoons chipotles in adobo sauce (or one chile and one tablespoon adobo)
salt and pepper to taste


I like potato skins, so I cut my potatoes into pieces that have nice-sized squares of skin. If you want to skin the potatoes, I recommend cooking them whole, running them under cold water, then peeling them. The skin will almost fall off of cooked potatoes and you don't waste so much. That goes for sweet potatoes, too.


Boil the potatoes and garlic in enough water to cover them for about 30 minutes, or until tender when forked. Drain, add milk and butter, and mash roughly. Return to head and add cheese and chipotles, mashing until desired consistency is reached. Serve 'em up.

This epicurious recipe is nice for mashed potatoes and this recipe. I also liked this recipe.

Note: I like little chunks of cheese rather than grated cheese that's been well blended into the potatoes. If you are like me, wait to add the cheese and chipotles until the potatoes are mashed well. Then stir in the chess and chipotles with a wooden spoon over low heat. Yum.

Simple, Delicious Garlic Green Beans


Sometimes we just eat green beans for dinner, because they are so good. If you can figure out how to get a wok or frying pan hot, and at just the right heat, you can use butter and scald the crap out of some beans and garlic. This is what you want. It took me a long time to figure it out, so I can say from a place of experience: err on the undercooked side. Raw green beans are edible, burnt green beans are not. It all starts with a very hot pan, and if you've got some oil that doesn't burn until a very high heat you're on your way. I use butter and olive oil. I love the olive oil flavor, and the butter raises the burn temperature just enough. If you can be patient and just let your pan heat up, then add the oil/butter for just the minute it takes for it to get really hot, then add the beans, you'll make something really delicious. Good luck!


Serves 2 hungry people:

2 handful of beans, tipped and toed (chop the ends)
2 table spoons butter
1 teaspoon olive oil (as I said, pick your oil as you will)
2 cloves garlic, chopped finely


Heat your pan. And let it get really hot. Add the butter, and it should immediately start to bubble and melt, like true frying butter does. Drisle over your oil, so it mixes with the butter. Once the butter is completely melted, but don't let it brown, add the green beans. Be careful! If they are at all wet the whole thing will sputter and try to burn you with little flecks of very hot oil/butter/water. Ouch. Use the longest handled wooden spoon you've got to stir the beans, but allow them to settle for a minute at a time so they get that wrinkly skin you want. They should cook for less than 10 minutes, more like 5 - depending on the heat you've worked up.


At 3-5 minutes (or 1 minute before they're done) add the chopped garlic, and continuously stir for 30 seconds or 1 minute. Let the garlic brown a bit. A little bit of burnt bean skin is okay. But the brilliant thing about these is that they will stay crispy in a way. Having trouble getting this? Comment and let me know what happened. I'll do my best to help.

Wednesday, April 27, 2011

Adobo Sauce with Dried Chipotles

I love adobo sauce, the stuff that canned chipotle peppers come in. Well, here I've got some dried chipotles and no adobo. Why not make my own? How can it go wrong? There will be chipotle peppers in it.

Here's the recipe I used, although I did half the portion because I wanted to save some dried peppers for... later maybe.

Makes about half a cup of sauce.

5 dried chipotle peppers, whole
1/4 teaspoon of salt
1/4 teaspoon of cumin
1/4 teaspoon of oregano
1/2 a small onion, chopped finely
1 clove garlic, chopped finely
2 tablespoons of ketchup
1.5 cups of water
2 tablespoons of malt vinegar (use cider vinegar, or red wine vinegar, if that's what you've got)
1 tablespoon olive oil


Heat a pan and put the oil, onions, and chipotles in to cook for about 4 minuntes, then add the garlic for one more minute. Add the vinegar to the water and mix, then pour it all into the pan. Add salt, cumin, oregano, and ketchup. Stir so things seem evenly spread. On very low heat, let reduce for 1-2 hours, or until there's about 1/2 a cup of liquid left and the peppers are soft. If you want it to be really smooth, take out the peppers, put the liquid in a food processor until blended, then put the peppers back in.


These are so good as a topping for burgers or hot sandwiches of any kind. They're not as hot as you think they'll be. I suggest chopping them up a bit and spreading them on a toasted roll, then adding black beans, avocado, queso fresco, and if you're into meat, some barbecue. Yummmmm.

Tuesday, April 26, 2011

Zucchini Sticks and Tortilla Espanola

Tonight I will make two dishes I have never made before: Tortilla Espanola and Zucchini Sticks. Making them simultaneously might be a challenge, since the zucchini needs to be served hot and the tortilla requires attention until it's almost done.

I searched around and found plenty of Tortilla Espanola recipes that agree with each other. Important points: the thinner you slice the potato, the faster it will cook and once the first side has cooked, don't be ashamed to use a plate to flip it (or put it in the over under the broiler for a few minutes at the end).

And lucky me, I found a fried zucchini recipe that calls for you to prep it and leave it in the fridge for half an hour. That might work out perfectly. I can deep fry while my Tortilla finishes cooking.

There are many, many recipes out there for both of these treats. There are oven-baked options for the zucchini, if deep frying freaks you out. Most of those recipes call for some kind of spray oil, which kind of freaks me out. I also noticed that a few recipes mention patting dry the zucchini once it's cut, which sounds like a brilliant idea. And another tip is to first put the zukes into flour, then the wet stuff, then the bread crumb/flower mixture. I also made myself some bread crumbs. Panko is not so readily available at the local Spar.

Bread Crumbs for 2:

One or two slices of bread. You can toast them or put them in the oven of 15 minutes. Once they're dried out enough, crumble them. Putting them in a large plastic bag and rolling over it with a dough roller works well. As does using your hands. If you use seasoned salt or garlic salt, throw in a few pinches of that. Or just plain salt will do.

Zucchini Sticks

I used a slightly modified version of Dianasaur's recipe.

So this went terribly for me, but the result was still edible and even delicious. My plan of doing two rather needy dishes at once was not a good plan. Take your time with these, especially the first time.

Serves 2:

1 medium zucchini
1 cup flour
1 cup breadcrumbs
1 large egg
enough oil (I used olive, but sunflower, rapeseed, or any veg oil will do) to reach about 2 inches high in a small pot.

Put the flour, egg and breadcrumbs in separate bowls, for dipping. Beat the egg until blended. Slice the zucchini lengthwise and then in half or thirds. Then slice them into four or five pieces lengthwise. That doesn't make much sense... Just try to make pieces about 2/3rd the size of your finger. Size does not matter, except they must fit in your dipping bowls.

About 40 minutes before you want to eat, prep your zucchini. Dip each piece into the flour, then the egg, then the breadcrumbs and place on a plate. What happened to me during this part was hilarious. First I was making tortilla espanola, and trying to get the potatoes cooked just right. So I threw an egg on the floor, just to make it harder on myself. Then because I was rushing, I did a terrible job with the dipping. My egg was almost immediately made into sludge by flour. And often the egg didn't stick enough, so the breadcrumbs wouldn't stick either... But I made it through. Put them on the plate and put them into the fridge. This is because when you deep fry something, the best crispiness comes from a very very cold thing going into very very hot oil.

About five minutes before you're ready to eat, heat 2 inches of oil in a small pot. You'll probably do 5 or 6 zucchini sticks at a time, depending on the size of your pot. You want the oil to be very hot, so start it up and leave it. After 5 minutes or so, drop a little spare piece of your crumbly stuff (assuming your zucchini turns out somewhat like mine) into the oil. If it immediately starts to bubble and fizz, you're ready.

Prep a plate with a towel on it, where your zucchinis will go to lose some of their oil after frying. Using a slotted spoon, put about 5 sticks into the pot. It should go kind of crazy, but if it doesn't don't worry. It will. They only need to be in the oil for about a minute, maybe 90 seconds. You'll just have to experiment. The more you deep fry, the better you get at understanding the heat of oil and its relationship to fried things.

Dipping Sauce:

I mix a few tablespoons of sour cream with a little salt and pepper. The traditional dip is marinara sauce - that part is up to you.


Tortilla Espanola:

Essentially this recipe, although I took tips from other places.

Serves 2

4 eggs, beaten
4 medium potatoes, sliced very thinly
1 medium onion, sliced very thinly
butter
salt
pepper

The trick here is to get the potatoes cooked first. It should take you about 15 minutes to cook through your potatoes. I use butter in the pan, but you can use oil. Make sure your potatoes won't stick, because if they are as thin as they should be, stuck will be the same as destroyed.

Sauté your potatoes one layer at a time, turning them before they brown. You want them cooked but not browned. I don't know why. Because I was busy throwing eggs on the floor I browned some of my potatoes and it turned out delicious anyway. You'll do the same kind of sauté with the onions.

Beat the eggs and add a teaspoon or so of salt.

Once all of the potatoes and onions are cooked, put them into your beaten eggs and let them settle. Then tip the whole thing into your pan, and even out the potatoes so you have a relatively level dish. Your pan should be hot! And after 5 minutes or so you will notice that the egg is mostly cooked, except on the top. If it starts to burn or brown too much on the bottom (which happened to me) take it off the heat and flip it. How? Well, I suggest doing this over the sink. And get a plate that's just smaller than your pan so you can set it in there evenly. Quickly flip the tortilla out of the pan and onto the plate, then slide it back into the pan on it's wet side. It'll only need a couple of minutes after that. Alternately, before it's really browned on the first side, you can put it into the oven for 5-10 minutes, until the topside has cooked.

Flipping the tortilla is fun. And traditionally you'd flip it a few times to get the shape just right. However, that won't change the flavor. I would serve this with some chopped parsley on top. Slice it like a pizza and serve!

Monday, April 25, 2011

Jalapeño and Cheese Risotto

I bought some risotto rice the other day, because I thought "How hard can that be? Risotto. It's just rice, with some stuff in it. Right?" But then it sat in the cupboard, and I made pasta with pesto instead.

Tonight I finally went for it. Found a lot of risotto recipes online... oh boy. And the most convincing was the Jamie Oliver site. Plus I just kind of trust him, for no good reason.

I used the recipe for three cheese risotto, but omitted the cheeses he mentions and added a double glocester (my version of a jack cheddar, here in Scotland) and some jalapeños, straight from the jar. No fresh jalapeños here. We'll only be here another month, otherwise I'd grow some myself. Yum. Off you go!

Serves 2, and risotto just isn't that great the second day so don't over do it.
Total time: give yourself an hour, including chopping all those things (aka prep)

Ingredients:
a dollop of butter and a swig of olive oil
500ml broth (vege or chicken or whatever you pleasure)
200g arborio rice (risotto)
1 medium onion, chopped fine
1 garlic clove, chopped fine
1 celery stick, chopped fine
1 glass dry white wine (or two shots of tequila, if you've got that handy)
75g cheese (preferably a monterey jack, but any cheddar will do) roughly chopped
small handful of chopped jalapeño peppers (note: this recipe is for jalapeños from a jar, if you have fresh jalapeños add them to your onions and cook them along)


Get your broth going. If you use broth cubes, put them in water and put them on the stove. Stir them in well (chop up a bit beforehand for ease of dissolving) and get them up to almost a boil. Leave broth on the stove, staying warm but not boiling, you will be ladling this into your risotto and it needs to be hot.

Put about a tablespoon of butter into a large saucepan on medium high heat(this will be the pot you cook the risotto in, so it should be a real pot). When it starts to bubble a little, add some olive oil (just a splash) and then add your onions. After 2 minutes add garlic and celery (and fresh jalapeños, if you're going that route). Cook for about 5 minutes, until soft. Stir often, so the onions don't burn.

Add risotto, stirring for about a minute. The risotto will start to appear translucent around the edges. Now add the glass of wine (or tequila) and keep stirring. Go ahead, watch the pot. And stir. The booze will cook off and the flavor will cook into the rice beautifully. When it gets almost dry, add your first ladle of broth. Lower temperature, the rice shouldn't be boiling, but simmering. Then, as the broth cooks into the rice, keep adding a ladle at a time. This should take 15 to 20 minutes. Test the rice after 15 minutes. Does it seem done? If you run out of broth, add a little water.

When the risotto is done, and you can tell because it'll be able to hold it's shape, take it off the heat and add the cheese and, if you didn't already, jalapeños. Stir in. Then take about 2 tablespoons worth of butter and whip it right in. Let sit for 3 minutes, so it can turn into restaurant grade risotto, and serve.

Garnish? I had some mixed green salad from a bag (yuck, plastic), and I put out some dressing I'd made the day before. See my dressing post below.

Feedback welcome!

Salad Dressing

The best way to ensure you'll include some salad with your meals? I say you should have some dressing handy - something delicious that store bought dressings never hit (besides Goddess Dressing, which I can't resist). Below is my simple fool-proof recipe, as well as variations. Don't be afraid to mess with portions and turn it into something you love. Dressing is easy!

It can also be super delicious as a dip for bread, by the way.

This basic dressing can sit on the counter for a few days with no bad effect. I keep adding to my little ramekin of dressing as we use it up. Olive oil is a preservative. Garlic is even better.


Ingredients:
equal parts:
olive oil
balsamic vinegar
two pinches of salt
two pinches of pepper


That is basic. Really. Once you get the proportions, you'll never go back to store bought. Then you can start adding things.

Asian Influence:
sesame seeds
soy sauce
peanut butter
rice vinegar

French Influence:
herbs de provence (yes, dried herbs will work. give it about five minutes and they won't taste like sticks.)
rosemary
thyme
sage

Italian Influence:
oregano
basil

For a little variety:
try adding a table spoon of whole grain mustard, or some peanut butter.
if you've got any fresh herbs, use a lot! don't be shy, pick a big bunch of parsley and chop it up fine.

Even if you use the basic four ingredients and just add parsley, you can serve it over plain old lettuce and salad suddenly becomes exciting. Experiment and taste as you go along. If it seems too taste-less, or too much like olive oil, add more vinegar or mustard. You can always revert to salt - it is a flavor enhancer and will make most things taste good. Just don't over do it. Add a pinch at a time until it seems right. That goes for all ingredients. Except for peanut butter. Don't pinch it, just use a fork and scoop it in. Then whip it up. So delicious.

Basic Potatoes

Potatoes are a tasteless starch for many people. Or they are an excuse for a vegetable as french fries next to a burger. Well. I make potatoes and green beans, and maybe a touch of salad, and call it dinner. The parts of this recipe which you'll have to adjust are cooking time and size of potato chunk. Every oven is different, and weird things can happen. Just go for it, and check in to see how your potatoes are going. The best part about this recipe is that if you over-do it, you'll just have deliciously browned - or blackened - potatoes.

Serves 2 (for two meals, great as leftovers)

Ingredients:

6 potatoes
olive oil
salt
pepper

optional: rosemary


How to? Pre-heat the oven to about 400F (200C).

Slice potatoes length-wise in half, and then slice into wedges. The size or shape isn't so important, as long as they are all about the same. You want them to cook at the same rate, so don't make some slices tiny and others bulbous. Roughly the same size and shape is all that matters, even if you make cubes, like home fries.

Take a cooking pan - this can be a cookie sheet with a lip, a glass casserole dish, a metal dish, whatever as long as it has a raised edge - and put about 2 tablespoons of olive oil in the bottom. Add about a teaspoon of salt and a teaspoon of pepper. If you've got it, add two or three teaspoons of rosemary. Stir it up with a wooden spoon, perhaps, but I recommend adding your potatoes and getting your hands in there. Try to make sure each piece of potato is oiled, and then the potatoes should be roughly evenly spread in the pan.

No worries, though, because halfway through you're going to stir the whole lot.

Put your potatoes in the oven. Leave them for 20 minutes. Take them out (carefully) and mix with a wooden spoon (or whatever you've got). Put them back for another 20 minutes. Don't be afraid to peek at them every 10-15 minutes while they're in the oven. They shouldn't take more than 40 minutes to cook, but if they're not starting to brown, take one out, let it cool a minute and test it. It is really hard to over cook these babies, so your main concern is not cooking them enough. Eventually, you'll learn what it feels like to stick a fork in a done potato, and you can skip the tasting step. If you want to.

The First Post

Sure, everyone has a blog. I have four, but don't let that worry you. They're not all about cooking.

I'm no chef, in fact I'm only picky when I can be and at the moment I live in the tiniest town you can imagine. The store just a minutes walk from home has the bare minimum, and none of it is organic. The eggs, I'm pretty sure, are the healthiest eggs I've had anywhere. And the milk and cheese are fantastic. Scotland is good for those things. I can also tell what is local - the tomatoes are from Spain, potatoes are grown here, green beans come from Egypt. I'm trying to stay as close to 'home' as possible, so nothing from the Americas or South Africa. But I think Egypt deserves my financial support at the moment, seeing as they just had a revolution.

I don't own a car, so what I find for ingredients are either from the local store, the store in the neighboring town, or from a town I took a 45 minute bus ride to reach. That's where I got the really good chevre, and some pretty good double glocester. Also, the wine is cheaper over there.

But here's the point: I'm not running down the street in my fancy car to get all the prime organic, free-range, local ingredients available. I don't want to own a car, ever again. I live extremely inexpensively, and I enjoy making that work. If I could, I'd buy organic. But I make do. And I'm finding that I can make some really delicious food. So you can, too. I'll try to post photos with my recipes, and I encourage you to do something very important: shop around.

My strategy is this: maybe I have risotto, some onions, garlic, and bottles of red wine handy. What do I do with that risotto? Well, I look online. I find a bunch of recipes for risotto and I read them all, noting similarities and little tricks that some people include. Then I realize I also have jalapeño peppers - does anyone make jalapeño risotto? Blackle search reveals that I will not be the first. Again, I read multiple recipes. In the end I choose a basic three cheese risotto recipe, and incorporate those jalapeños when it seems appropriate. That is my first recipe post... coming right up.